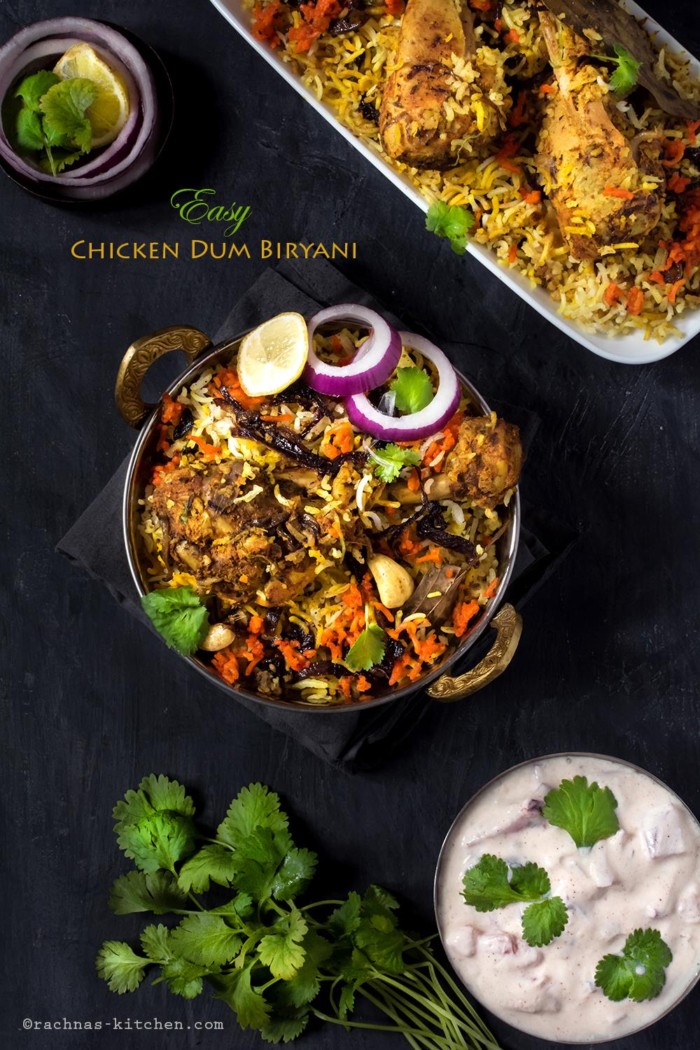
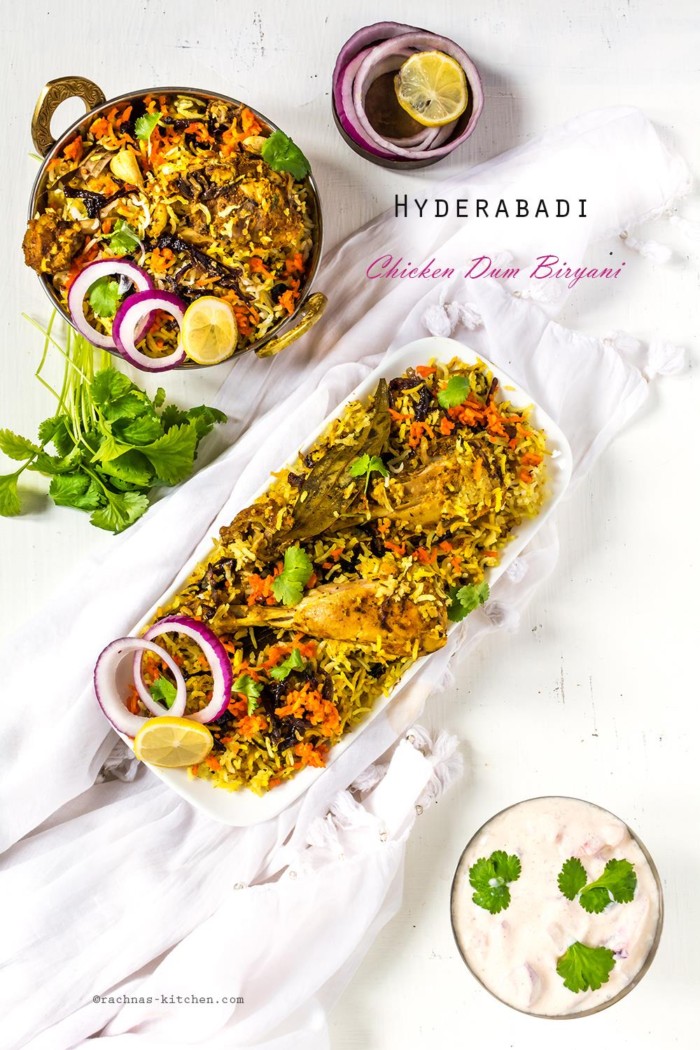
Hyderabadi Chicken Biryani is a flavourful and delicious combination of juicy tender chicken and aromatic rice with fresh Indian spices. Biryani is derived from the Farsi word ‘Birian’. In Farsi, Birian means ‘Fried before Cooking’. Hyderabadi chicken biryani is so well-known in India that it doesn’t need any introduction. It is popular not only in Hyderabad but all over the country.
There are two kinds of biryani
1. Kachi biryani – Generally Hyderabadi style
2.Pakki biryani – Lucknow style biryani
This biryani is kachi biryani, means that the chicken is raw before mixing it with rice while in pakki biryani chicken is cooked before mixing with rice.
Indian chicken biryani is not as arduous as many people think rather it requires more time and following of step by step method.
If you are looking for chicken recipes, you may like these
In this Hyderabadi chicken biryani recipe
I have tried to capture and explain every single steps which can help one to make exactly or better chicken dum biryani than the restaurants. In this recipe I have used freshly ground home made biryani masala. You can very well use store bought biryani masala.
Also used shallow fried brown onions in this recipe instead of deep fried, just to avoid extra saturated fat in my biryani.
The sign of good biryani is that the taste of biryani should be savoury not spicy. The grains of rice of biryani should be separate from each other.
List of the ingredients is bit long but don’t worry it doesn’t take so long to prepare. I would recommend to try it at least once, it is worth a try.
Ingredients
450 grams or 1 lb bone-in-chicken
For buttermilk brine solution
3 tablespoon yogurt
1/2 teaspoon baking soda
1/4 teaspoon salt
water as required
For chicken marination
1 tablespoon ginger garlic paste
1 tablespoon lemon juice
1/2 teaspoon turmeric
1/8 teaspoon nutmeg powder
1/2 teaspoon cumin powder
1 tablespoon kashmiri red chili powder
1/2 teaspoon white pepper powder
1 teaspoon biryani masala
1/4 teaspoon green cardamom powder
1 green chili ( adjust as per taste)
3 tablespoon yogurt
1 tablespoon mint sauce or crushed mint leaves
salt to taste
For rice preparation
2 cups long grain basmati rice (soaked for 20 minutes, drain and set aside)
4 cups water
1 teaspoon oil
1 aniseed
2 strands of mace
2 black cardamom
4 green cardamom
2” cinnamon stick
8 cloves
2 bay leaf
½ teaspoon pepper corn
1 teaspoon shahi jeera / caraway seeds
For assembling biryani
2 tablespoon oil
Shallow fried onions from 3 medium sized onions
2 tablespoon finely chopped coriander leaves
2 tablespoon of finely chopped mint leaves or mint sauce
2 teaspoon ghee
1/4 cup boiled warm milk
1 teaspoon kewra essence
1 teaspoon biryani masala powder
8-10 cashew nuts
1 cup all purpose flour dough (to seal the pot )
Step By Step Hyderabadi Chicken Biryani Recipe
Brining the chicken
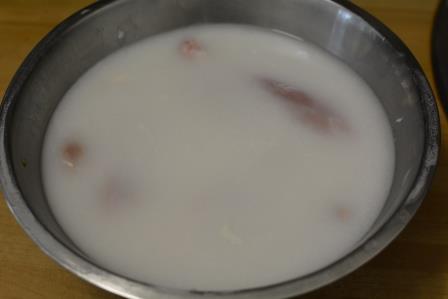
Step 1. Brining the chicken is the most important step in any biryani recipe. It makes chicken juicy and tender.
Wash and clean chicken.
Prepare buttermilk brine solution. To make buttermilk, add curd/ yogurt to a bowl, whisk it. Then add 2 cup water, baking soda and salt.
Add chicken to the butter milk brine solution. Let it rest for at least 2 hours at room temperature.
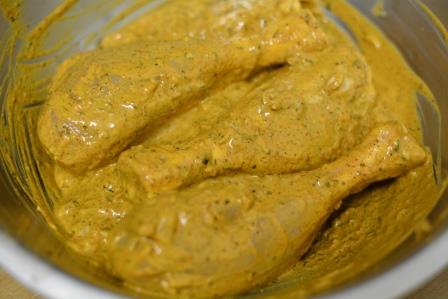
Step 2. After 2 hours, drain the chicken. Now marinate chicken, add spices ginger garlic paste, lemon juice, turmeric powder, nutmeg powder, cumin powder, kashmiri red chili powder, white pepper powder, biryani masala, green cardamom powder, 1 green chili ( adjust as per taste), yogurt, mint sauce or crushed mint leaves and salt to taste.
In this step I have used mint sauce as mint leaves were not available, you can use chopped mint leaves if available.

Mix the whole mixture well. Let the chicken rest on kitchen counter for 1 to 2 hour.
Preparing Rice
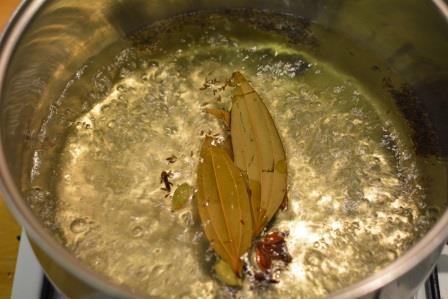
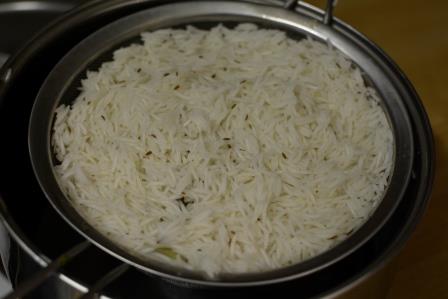
Step 3. Place a heavy bottom sauce pan over high heat. Add oil, mace, aniseed, black cardamom, green cardamom, cinnamon stick, cloves, bay leaf, pepper corn and shahi jeera (black cumin).
Add rice and cook uncovered.
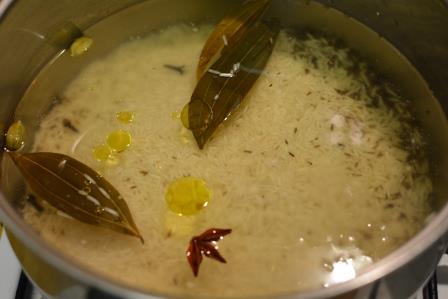
With in 3-4 minutes rice will start bouncing in water.
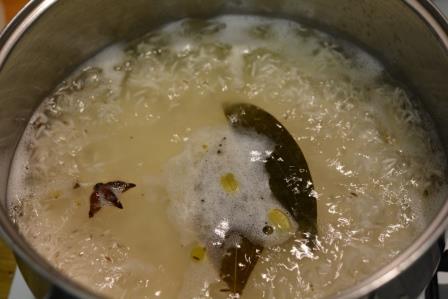
Cook the rice for about 5 minutes or until it is 60 % done. Be sure that rice are not over cooked.
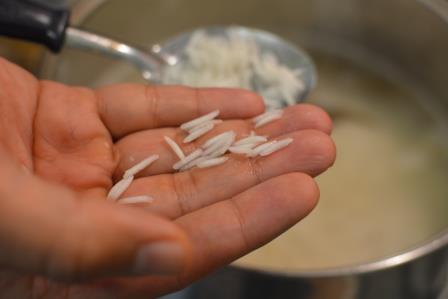
Drain the rice and add cold water to prevent further cooking.
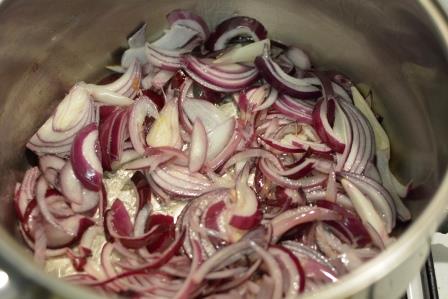
Preparing brown onion
Step 4. Heat a heavy bottom sauce pan in which biryani will be cooked. Add 2 tablespoon of oil. Once oil is hot enough, add sliced onions. Cook them on medium high flame, stirring constantly.
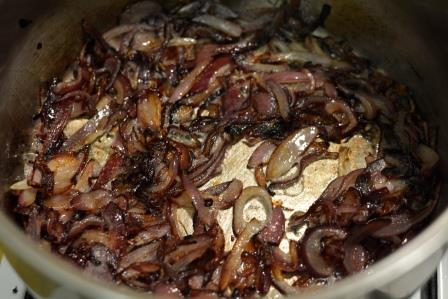
After 6-7 minutes, onion will caramelize. Switch off the gas and keep them aside.
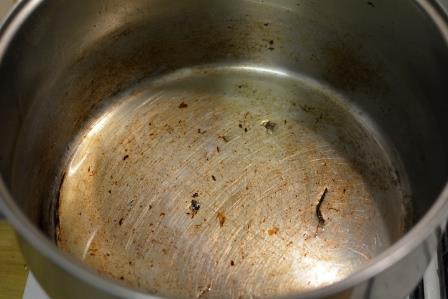
Step 5. In the same pan in which onions were cooked, add 1 teaspoon ghee or oil.
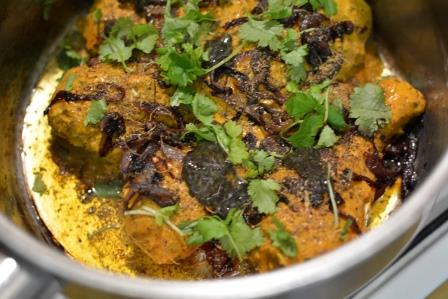
Step 6. Add marinated chicken and spread it into a layer. Sprinkle biryani masala, half of coriander leaves, mint leaves (mint sauce) and half of fried onions.
Layer the rice all over.
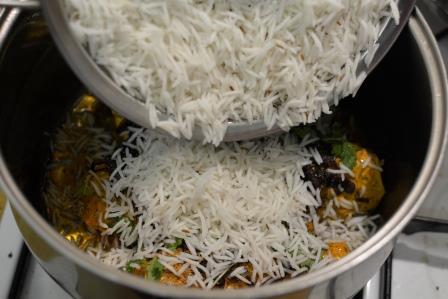
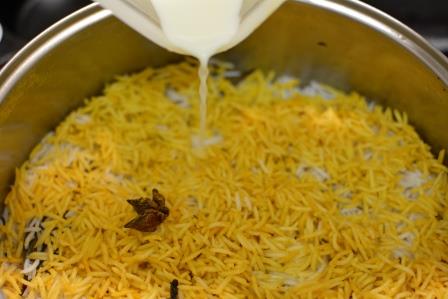
Step 7. Spread it uniformly. Save 1/2 cup of rice and colour them yellow with turmeric powder.
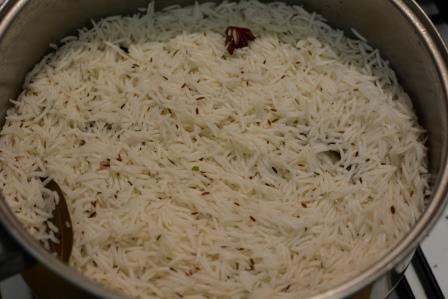
Sprinkle yellow coloured rice and pour 1/4rth cup of milk all over the rice.
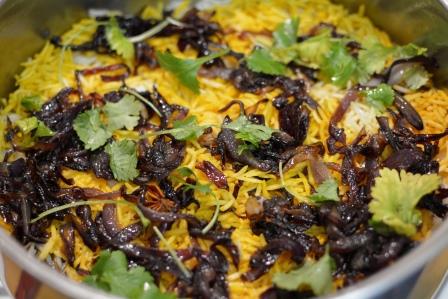
Step 8. Layer the left fried onions and coriander leaves. Pour melted ghee.
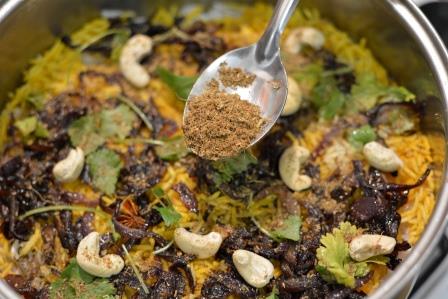
Step 9. Sprinkle the biryani masala, kewra water and cashew nuts. You can also use rose-water instead of kewra water.
Step 10. Fold a kitchen cloth into square and cover the rice. It will soak all extra moisture.
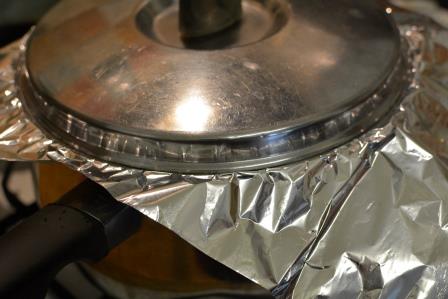
Cover the pot with a silver foil and put the lid on.
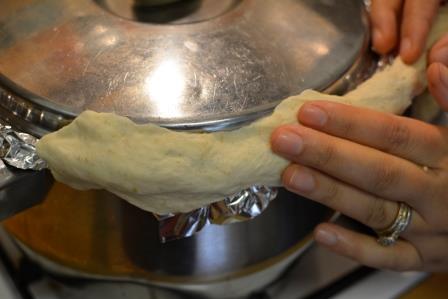
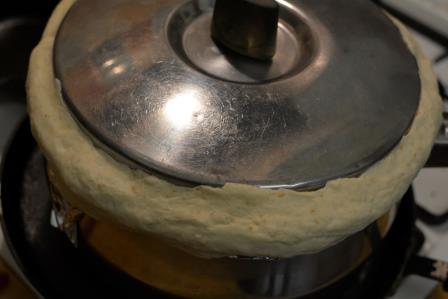
Step 11. Fold extra silver foil towards the lid and seal the pot with all purpose flour dough all around. I have used silver foil because it not only seal the steam but also make little easier to remove dough.
Step 12. Now cook the biryani on low heat for 15 minutes. After 15 minutes of slow cooking, dough should have become hard to touch. Then place a skillet (tawa) on low heat and place the biryani pot on it. Cook for another 15 – 20 minutes. This is called dum process. Switch off flame and let it rest for another 20 minutes.
Step 13. Cut the seal with knife. Garnish the delicious Hyderabadi chicken biryani with coriander leaves and onions and serve hot. You can serve with Spinach raita or mixed veg raita

- 450 grams or 1 lb bone-in-chicken
- 3 tablespoon yogurt
- 1/2 teaspoon baking soda
- 1/4 teaspoon salt
- water as required
- 1 tablespoon ginger garlic paste
- 1 tablespoon lemon juice
- 1/2 teaspoon turmeric
- 1/8 teaspoon nutmeg powder
- 1/2 teaspoon cumin powder
- 1 tablespoon kashmiri red chili powder
- 1/2 teaspoon white pepper powder
- 1 teaspoon biryani masala
- 1/4 teaspoon green cardamom powder
- 1 green chili adjust as per taste
- 3 tablespoon yogurt
- 1 tablespoon mint sauce or crushed mint leaves
- salt to taste
- 2 cups long grain basmati rice soaked for 20 minutes, drain and set aside
- 4 cups water
- 1 teaspoon oil
- 1 aniseed
- 2 strands of mace
- 2 black cardamom
- 4 green cardamom
- 2 ” cinnamon stick
- 8 cloves
- 2 bay leaf
- ½ teaspoon pepper corn
- 1 teaspoon shahi jeera / caraway seeds
- 2 tablespoon oil
- Shallow fried onions from 3 medium sized onions
- 2 tablespoon finely chopped coriander leaves
- 2 tablespoon of finely chopped mint leaves or mint sauce
- 2 teaspoon ghee
- 1/4 cup boiled warm milk
- 1 teaspoon kewra essence
- 1 teaspoon biryani masala powder
- 8-10 cashew nuts
- 1 cup all purpose flour dough to seal the pot
-
Brining the chicken is the most important step in any biryani recipe. It makes chicken juicy and tender.
-
Wash and clean chicken.
-
Prepare buttermilk brine solution. To make buttermilk, add curd/ yogurt to a bowl, whisk it. Then add 2 cup water, baking soda and salt.
-
Add chicken to the butter milk brine solution. Let it rest for at least 2 hours at room temperature.
-
After 2 hours, drain the chicken. Now marinate chicken, add spices ginger garlic paste, lemon juice, turmeric powder, nutmeg powder, cumin powder, kashmiri red chili powder, white pepper powder, biryani masala, green cardamom powder, 1 green chili ( adjust as per taste), yogurt, mint sauce or crushed mint leaves and salt to taste.
-
In this step I have used mint sauce as mint leaves were not available, you can use chopped mint leaves if available.
-
Mix the whole mixture well. Let the chicken rest on kitchen counter for 1 to 2 hour.
-
Place a heavy bottom sauce pan over high heat. Add oil, mace, aniseed, black cardamom, green cardamom, cinnamon stick, cloves, bay leaf, pepper corn and shahi jeera (black cumin).
-
Add rice and cook uncovered.
-
With in 3-4 minutes rice will start bouncing in water.
-
Cook the rice for about 5 minutes or until it is 60 % done. Be sure that rice are not over cooked.
-
Drain the rice and add cold water to prevent further cooking.
-
Heat a heavy bottom sauce pan in which biryani will be cooked. Add 2 tablespoon of oil. Once oil is hot enough, add sliced onions. Cook them on medium high flame, stirring constantly.
-
After 6-7 minutes, onion will caramelize. Switch off the gas and keep them aside.
-
In the same pan in which onions were cooked, add 1 teaspoon ghee or oil.
-
Add marinated chicken and spread it into a layer. Sprinkle biryani masala, half of coriander leaves, mint leaves (mint sauce) and half of fried onions.
-
Layer the rice all over.
-
Spread it uniformly. Save 1/2 cup of rice and colour them yellow with turmeric powder.
-
Sprinkle yellow coloured rice and pour 1/4rth cup of milk all over the rice.
-
Layer the left fried onions and coriander leaves. Pour melted ghee.
-
Sprinkle the biryani masala, kewra water and cashew nuts. You can also use rose-water instead of kewra water.
-
Fold a kitchen cloth into square and cover the rice. It will soak all extra moisture.
-
Cover the pot with a silver foil and put the lid on.
-
Fold extra silver foil towards the lid and seal the pot with all purpose flour dough all around. I have used silver foil because it not only seal the steam but also make little easier to remove dough.
-
Now cook the biryani on low heat for 15 minutes. After 15 minutes of slow cooking, dough should have become hard to touch. Then place a skillet (tawa) on low heat and place the biryani pot on it. Cook for another 15 - 20 minutes. This is called dum process. Switch off flame and let it rest for another 20 minutes.
-
Cut the seal with knife. Garnish the delicious Hyderabadi chicken biryani with coriander leaves and onions and serve hot.
Sidra Khan says
I like Hyderabadi dishes Thanks admin
Amita says
Superb , followed step by step .*****
rachnaskitchen says
Thank you
Anu says
Where is the recipe for the biriyani masala. Please leave a link
rachnaskitchen says
Hi Anu, I had thought to add Biryani masala recipe but never found time for it. Sorry if you were looking for the Biryani masala recipe and didn’t find here.
Vanita R.A says
Wow. Awesome Presentation & Clicks. Thks for sharing the recipe step by step. Pls post the recipe for Biryani Masala pd. Love all your posts. Thks dear. Have a great day. stay blessed.