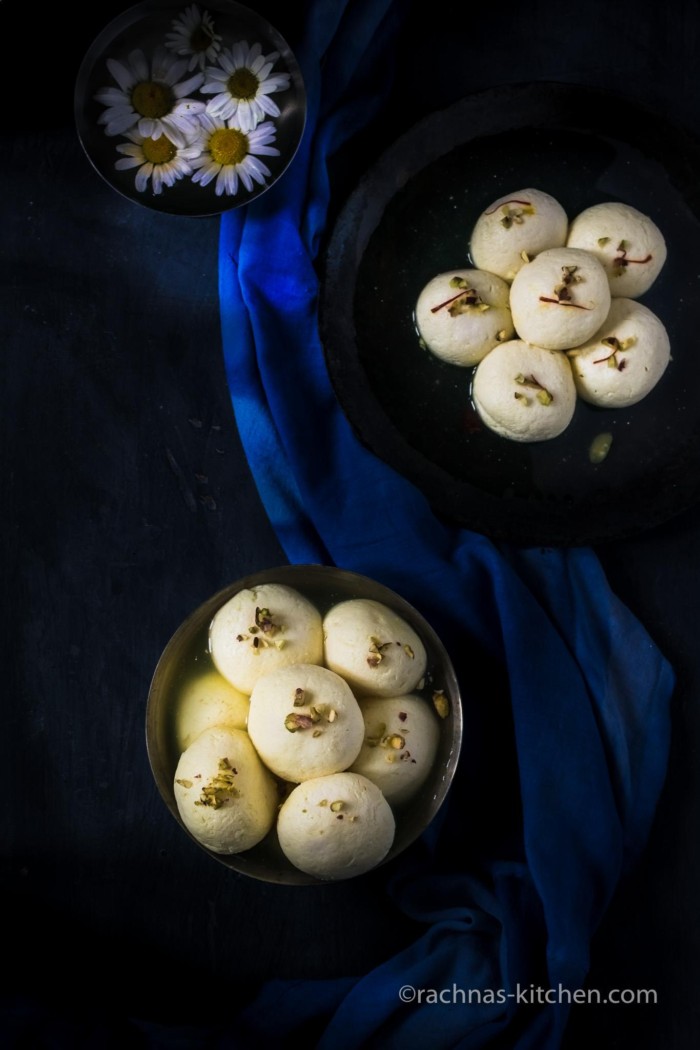
Rasgulla Recipe
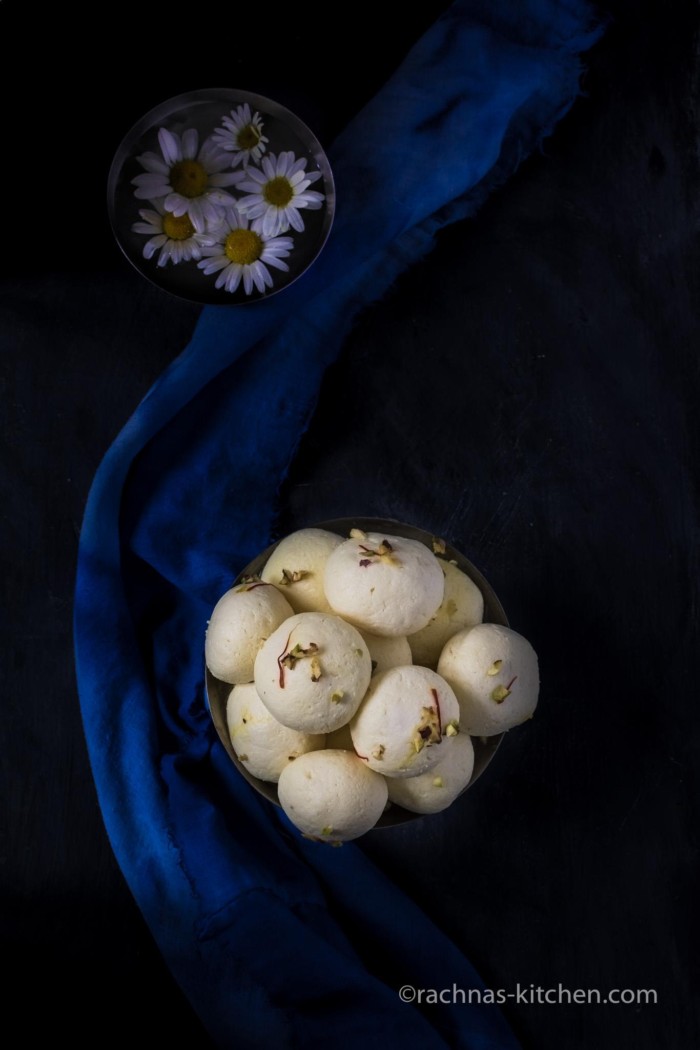
Rasgulla recipe is a delicacy of Bengal but originated in Orissa. It is one of the most famous Bengali sweets recipe. Listening word rasgulla could make your mouth watery. It is a delectable melt in mouth cheese ball dipped in sugar-water.
The rasgulla recipe is easy if you follow each and every step carefully. I have had tried Rasgulla many times and after facing many failures I finally succeeded. It is not difficult to prepare them but there are few points to concentrate on during it’s preparation. In this post, I have tried to explain every single point which I have learnt during my trials.
In this easy rasgulla recipe I kept it simple , first making the chena (coagulated milk), second cooking the chena balls and third soaking them in sugar water. That’s all.
In this rasgulla recipe process I have cooked the chena balls in 1:5 ratio ( 1 cup sugar add to 5 cup water). For cooking chena take deep broad vessel and put only few balls because chena expands during cooking and almost become double in size, so keep this in mind while choosing the vessel. I have not used pressure cooker in this recipe because I can’t see what’s happening inside. I have used a sauce pan with transparent lid as I love to watch my rasgulla puffing 😉
Another important point is the amount of heat and timing. It’s essential to slide cheese balls only when sugar-water is boiling hot and just cook for 5 minutes and turn flame slowest possible. Once they are cooked, immediately immerse them in water which is at room temperature, following this step, they will not lose their shape.
Throughout the article I have pointed all important steps and tips which could help you to make these spongy rasgulla at home without much hassle. Now off to the recipe.
If you are looking some other Indian desserts, you may like Restaurant Style Gulab Jamun Recipe, Kalakand Recipe In Microwave , Besan ladoo recipe with video and Mathura Ka Peda Recipe.
Some other Indian dessert available on blog
3. Gulab jamun recipe with khoya
Ingredients
For chena
5 cups full fat milk
2 to 3 tablespoon lemon juice, add as required
2 teaspoon semolina(rava)
½ teaspoon cardamom powder (elaichi powder)
For boiling rasgulla
1 cups sugar
5 cups water
For sugar syrup
1 ½ cups sugar
3 cups water
Few saffron threads
1/2 teaspoon cardamom powder
1 tablespoon kewra water
Let’s Prepare Rasgulla Recipe
Preparing chena
Step 1. First pour milk in a pan and allow it to get a boil. Meanwhile you can lineup a cotton kitchen towel or muslin cloth in a strainer. Stir the milk occasionally so that milk doesn’t stick to the bottom.
Once milk comes to boil, turn the heat to minimum lowest or switch off the gas because we don’t want chena to become hard. Then add 1 tbsp lemon juice in the centre and stir, repeat this for 1 time more.
Step 2. Now milk must have curdled, if not, you may repeat the same for 1 time more. Once milk has curdled properly, pour the milk to the lined strainer ( Don’t throw the whey water, save it for making chapati dough which makes chapatis very soft and has good nutrients).
Gather the kitchen towel from the sides and rinse the chena very well in running water. It will remove the tangy flavour from the chena (coagulated milk) and doesn’t let the chena to cook more, so prevents hardening. 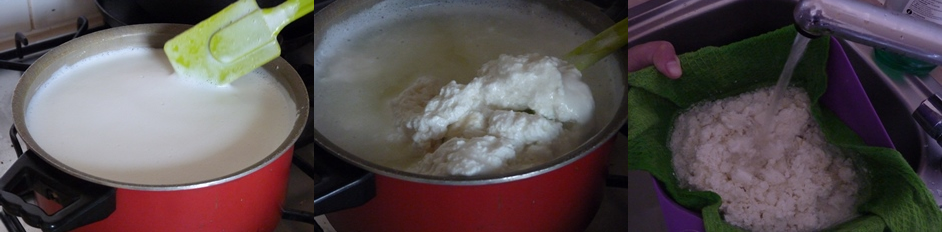
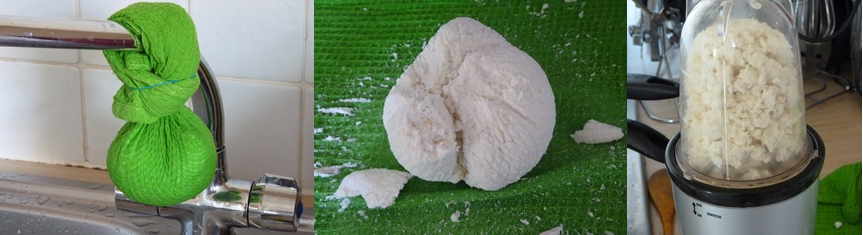
Step 3. Now a crucial step comes that is correct amount of moisture. Remember one thing excess water or moisture in the chenna will result in broken rasgullas while cooking. So what I do is squeeze the water as much as possible with hand and hang chena for about 30 minutes.
You may also use another method that is place a heavy weight on the chena for 7 to 8 minutes, but hanging method always works for me. After 30 – 35 min, open the chena and break it into big chunks. Take all piece into mixer jar and grind it, into smooth paste.
Preparing chena balls
Step 4. Grind chena only for 1 min else ghee will separate from chena and you will not be able form balls out of it. Now take out the mixture into a large plate. Add semolina and elaichi powder. Now with the heel of your palm start mashing it with little pressure and stop when chena start releasing ghee. You may see greasiness on your hand. It took me around 6-7 minutes as I have grounded it earlier.

Step 5. Now chena forms a nice and smooth dough. Now keep a big deep vessel on high flame and pour 5 cup of water into it. Add 1 cup of sugar and let it come to a boil. I always cook my rasgulla in 1:5 ratio (sugar:water). Meanwhile you can prepare chena balls, pinch small portions from the chena and roll them between your palms to a smooth round ball. Prepare all this way.
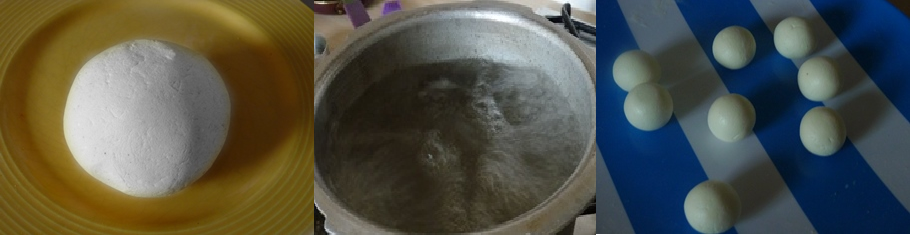
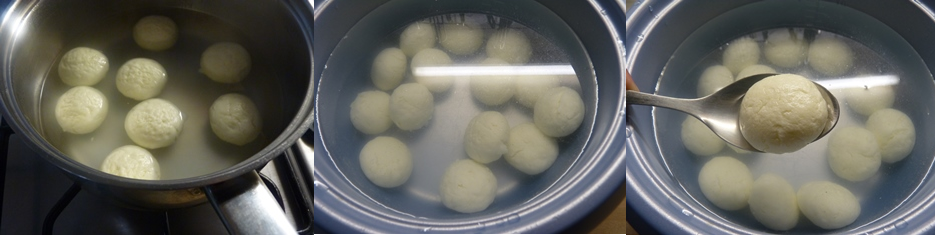
Step 6. Now once sugar-water come to boil slide gently all the cheese balls into it and cover the lid immediately, so that steam remain inside vessel. Cook for about 5 on high heat and then turn the flame to minimum possible flame. Now cook it covered for next 15 minutes on lowest flame. Rasgulla are now cooked. You may check it by pressing a sponge with your finger if it bounces back to its original shape, its cooked.
Step 7. Now take a another pot and add some room temperature water. Shift all cooked rasgulla into it. You can see how puffy they have turned. Freshwater is necessary because they retain their shape when immersed in fresh water.
Step 8. I made sugar syrup separately by adding 1 ½ cup of sugar to 3 cups of water. Add some threads of saffron, elaichi powder and kewra essence. Bring to boil and simmer it for 5 minutes and sugar syrup is ready. There is no need of strings in this sugar syrup.
Step 9. Squeeze sponge in between your palm and soak into sugar syrup for 1 hour. Spongy Rasgulla recipe are ready to serve now or refrigerate them and serve later. They taste best after soaking them overnight.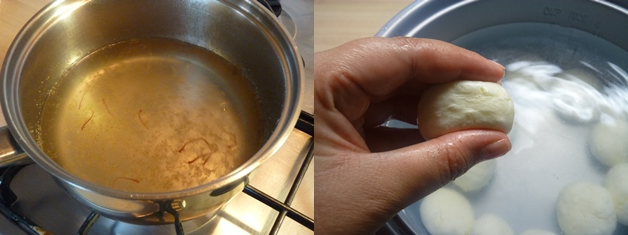
The melt-in-your mouth texture of the rasgulla will make you crave to finish all at one go. Heavenly delicious spongy rasgulla could make you win hearts of your family.
Tips
- Don’t throw the whey water, save for making chapati dough which makes chapatis very soft and has good nutrients.
- Do not use store bought paneer to make this sweet. This recipe calls for homemade chena.
- If prepared chhena is too dry, rasgulla will turn hard and if it is too soft, they will break while cooking and not retain their shape after cooking. So moisture content is the key to make good quality rasgulla.
- You can clean the sugar syrup if you want crystal clear sugar syrup. Add 2 tablespoon of milk to boiling sugar syrup. Scum appears on the surface in just another 10 seconds, remove it. And then cooked rasgulla.
Here is a recipe card for rasgulla recipe
- 5 cups full fat milk
- 2 to 3 tablespoon lemon juice add as required
- 2 teaspoon semolina rava
- ½ teaspoon cardamom powder elaichi powder
- 1 cups sugar
- 5 cups water
- 1 ½ cups sugar
- 3 cups water
- Few saffron threads
- 1/2 teaspoon cardamom powder
- 1 tablespoon kewra water
-
First pour milk in a pan and allow it to get a boil. Meanwhile you can lineup a cotton kitchen towel or muslin cloth in a strainer. Stir the milk occasionally so that milk doesn't stick to the bottom.
-
Once milk comes to boil, turn the heat to minimum lowest or switch off the gas because we don't want chena to become hard. Then add 1 tbsp lemon juice in the centre and stir, repeat this for 1 time more.
-
Now milk must have curdled, if not, you may repeat the same for 1 time more. Once milk has curdled properly, pour the milk to the lined strainer ( Don't throw the whey water, save it for making chapati dough which makes chapatis very soft and has good nutrients).
-
Gather the kitchen towel from the sides and rinse the chena very well in running water. It will remove the tangy flavour from the chena (coagulated milk) and doesn't let the chena to cook more, so prevents hardening.
-
Now a crucial step comes that is correct amount of moisture. Remember one thing excess water or moisture in the chenna will result in broken rasgullas while cooking. So what I do is squeeze the water as much as possible with hand and hang chena for about 30 minutes.
-
You may also use another method that is place a heavy weight on the chena for 7 to 8 minutes, but hanging method always works for me. After 30 - 35 min, open the chena and break it into big chunks. Take all piece into mixer jar and grind it, into smooth paste.
-
Grind chena only for 1 min else ghee will separate from chena and you will not be able form balls out of it. Now take out the mixture into a large plate. Add semolina and elaichi powder. Now with the heel of your palm start mashing it with little pressure and stop when chena start releasing ghee. You may see greasiness on your hand. It took me around 6-7 minutes as I have grounded it earlier.
-
Now chena forms a nice and smooth dough. Now keep a big deep vessel on high flame and pour 5 cup of water into it. Add 1 cup of sugar and let it come to a boil. I always cook my rasgulla in 1:5 ratio (sugar:water). Meanwhile you can prepare chena balls, pinch small portions from the chena and roll them between your palms to a smooth round ball. Prepare all this way.
-
Now once sugar-water come to boil slide gently all the cheese balls into it and cover the lid immediately, so that steam remain inside vessel. Cook for about 5 on high heat and then turn the flame to minimum possible flame. Now cook it covered for next 15 minutes on lowest flame. Rasgulla are now cooked. You may check it by pressing a sponge with your finger if it bounces back to its original shape, its cooked.
-
Now take a another pot and add some room temperature water. Shift all cooked rasgulla into it. You can see how puffy they have turned. Freshwater is necessary because they retain their shape when immersed in fresh water.
-
I made sugar syrup separately by adding 1 ½ cup of sugar to 3 cups of water. Add some threads of saffron, elaichi powder and kewra essence. Bring to boil and simmer it for 7- 8 minutes and sugar syrup is ready. Nearly 1 thread sugar syrup is required.
-
Squeeze sponge in between your palm and soak into sugar syrup for 1 hour. Spongy Rasgulla are ready to serve now or refrigerate them and serve later. They taste best after soaking them overnight. The melt-in-your mouth texture of the rasgulla will make you crave to finish all at one go. Heavenly delicious spongy rasgulla could make you win hearts of your family.
Anu-My Ginger Garlic Kitchen says
Indeed this ‘Spongy Rasgulla’ looks so delectable and divine. Step by step pictures are great for understanding. Lovely share, Rachna! 😀
rachnaskitchen says
Thank you so much. Glad that you liked it 🙂
Jeena says
yummm yummm, wow wow, what more, outstanding…..classic, spongy rasgullass…
rachnaskitchen says
Thankyou so much dear !!
padma says
Perfectly made rasgullas dear:)..They look so spongy and lovely clicks and presentation:)..AWESOME!!
rachnaskitchen says
Thanks Padma !!
Parindu Shah says
After the Rasilamasis are cooked in (1:5)sugar syrup,, do we have to add them to (1:2)wala hot sugar syrup ?
alkajena says
Not only the Rosgullas are perfect , the clicks are amazing too
rachnaskitchen says
Thankyou so much Alkajena 🙂
Umang Mittal says
The step by step method n pictures which r given to make “Spongy Rasgulla” r so easy to understand. I have had never before gone thru such an easy receipe. Thank-you so much Rachana. ☺
rachnaskitchen says
Thanks Umang Mittal !!
marudhuskitchen says
lovely juicy spongy rasagulla…love to make it as perfect as yours…
rachnaskitchen says
Thankyou Vaani. Do try and let me know how they turned out for you .
Ritu ahuja says
wow..I love rasgullas. They look super yummy. Very tempting, I wish I could grab one. Yum yum yum
rachnaskitchen says
Thankyou so much Ritu !!
Kirti says
Delicious recipe and brilliant colors in pics. So lovely. Can’t wait to have one !
veena says
wow! so soft and tasty!
rachnaskitchen says
Thankyou Veena !!
minnie@thelady8home says
Those roshogollas looks so so good! Beautifully done, great pictures. Fantastic. Bookmarked.
rachnaskitchen says
Thanks Minnie.
Antojo en tu cocina says
yumm!!!
rachnaskitchen says
Thanks Maite!!
Saanvi says
Wow. Mouthwatering…….
rachnaskitchen says
Thanks Saanvi !!
Sundari says
yummy rasagullas.. perfectly made!!
rachnaskitchen says
Thankyou Sundari !!
Sandhya Hariharan says
The first image of rasagulla’s are definitely calling me out.. They are lovely and very well shot.
rachnaskitchen says
Thankyou so much for appreciating!!
Sherry says
Thank you so much for this recipe. It looks very yummy. I will definitely try making it.
rachnaskitchen says
Thanks Sherry, glad that you liked it.
Subi says
Hi
Where u r using semolina(rava). And whether we need to roast the rava before using it?
rachnaskitchen says
Hi Subi,
Add semolina in step 4. and roasting is not required.
Thanks
Srilatha says
Hello rachana , thanks for the lovely details u have provided .. one of my fav Indian sweets .. I tried it Sterday .. came out so fluffy and soft .. it’s our deepavali sweet .. my family loved it .. thank u so much for the step by step pics which also helped me a lot on acquiring the soft rasgullas .. keep posting more ..
rachnaskitchen says
Thank you so much Srilatha. Glad to know that it came superb for you. Appreciation from my readers means a lot to me. Happy Diwali !.
Rukshana says
Hi Rachna,
If I am making these for rasmalai do I still need to soak in sugar syrup?
Thanks,Rukshana
rachnaskitchen says
Hi Rukshana,
If you make these sponges for rasmalai you don’t need to soak them in sugar syrup instead make thickened milk (ras) for rasmalai. Please refer this my rasmalai recipe post.
Thank you
JG says
Thanks for the detailed recipe and nice tips. Its the tips and the tricks that make all the difference.
Uzma says
Hi,
I tried using your recipe, unfortunately I have grinded the chenna into smooth paste n now I’m unable to make balls . Pls help what should I do with that paste now?
Thanks in advance.
rachnaskitchen says
Hi Uzma,
I am so sorry that recipe didn’t turned out well for you. Chena has too much moisture. Do one thing squeeze the water and tie it in a muslin cloth and let the chena hang for 30 minutes and again try to knead it. If still its not working, you can use that chena paste in kheer or rabdi or you can make makhani gravy, add in that. Hope this helps.
Debra Daniel says
Hey,
Thanks for amazing article on Rasgulla I heard and saw many rasgulla recipe but never saw like this its kind new thing for me HAHHA
I will be trying this in upcoming weekend because I have invited some guests in my
home so it will be better to serve them this amazing recipe
but can you please clear my one question that is it possible to use
in it ? or not ? IF yes !
then how much
please reply I will be waiting
Thanks Debra
Minahil says
Hello ma’am I am living in south Africa I wants to make rasgullas restaurant style. Should I use cornflour and maida (all purpose flour) with chena ??. Please give me a suggestion.